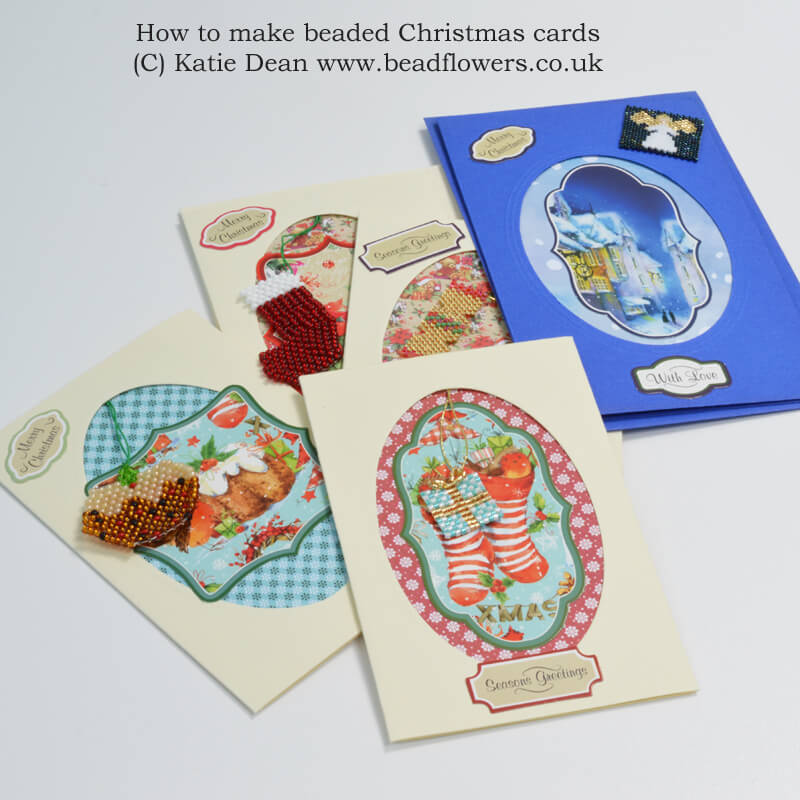
Last week, when I announced my ‘be prepared’ campaign, I promised you some help in avoiding the common Christmas crafting nightmare. So, this week, I’m showing you how to make beaded Christmas cards.
Just quickly, before I get on to that. If you missed last week’s blog with it’s three simple steps for getting you prepared, you can find it here.
Remember, if you’re not ready to learn how to make beaded Christmas cards today, you can bookmark this page and return to it later. So, either click on your ‘add to favourites’ icon, or press CTRL + D to create the bookmark.
How to make beaded Christmas cards in 6 simple steps!
So, back to those beaded Christmas cards. Way, way back in 2003, I was looking for an idea.
I had some friends to whom I wouldn’t normally give a full gift. But I wanted to say thank you for their kindness to me.
I was thinking that a card, even a handmade one, didn’t seem quite enough. So, then I came up with my idea for ‘keepsake cards’.
These are a card and gift in one. So, I made a beaded keepsake – in this case a Christmas decoration – to attach to a handmade card.
The idea was that the keepsake was detachable, so it had a lifetime beyond the basic card. Of course, this idea works particularly well for Christmas cards. The keepsakes are ideal Christmas decorations.
So, today, I’m going to show you how to make beaded Christmas cards with this keepsake idea. Best of all – it’s only six simple steps!
(If you are looking for a fully beaded Christmas card, I can help you out there too… I have a design for one of those in my Keepsake Cards book. You can find that here.)
Right, back to today’s card instructions…
Step 1
This is a really important step. So, make sure you follow it precisely.
Read the whole of this blog. Then come back up here and start again, but second time around, follow along and make your card as you go.
Why have I asked you to do this? Well simply, you should get to know the steps you are about to take because they may have an impact on how you plan your project.
It is good practice to read any craft tutorial through before you start. So, get into the habit of doing that now.
Step 2
Now you’ve read everything once and you’re back here ready to start… It’s time to gather your materials. You will need:
- One beaded motif
- A tri-fold aperture card blank
- Some shirring elastic
- A selection of Christmas paper or material
In just a second, I’m going to take you through each of the materials to explain what you need more precisely. however, before I do that, here’s a list of the tools you will need:
- Craft scissors
- Sellotape
- Double-sided sellotape (or glue)
- Possibly, a ruler and pencil for measuring and marking
The beaded motif
This is the beaded part of the card, so you should make a motif. Happily, I’m not going to leave you floundering in the dark here!
I have a couple of helpful options for you. This tutorial includes five little Christmas motifs , plus two Christmas greetings. These are perfect for this project.
You don’t need any special beading experience. The motifs use a variety of basic bead-weaving techniques. So, even if you’re just getting started, you can make one of these.
Grab the tutorial!
Alternatively, you might like to choose from one of these beading kits. The snowflakes kit will make at least 10 snowflakes in two sizes. So, that’s probably this year’s ‘special’ cards sorted for you!
You will be using really simple wirework for this little project. The kit includes beads in two different sizes, plus the wire. You also get really comprehensive instructions. So, this is perfect for all levels. (I only have limited stocks of these kits, so don’t miss out!)
Grab my snowflakes kit!
So, now you’ve got the beaded motif sorted, let’s move on with learning how to make beaded Christmas cards.
Tri-fold Aperture Card
You should be able to search for this in your local craft store, or website. The aperture card allows you to create some decoration to sit behind your beaded motif.
The tri-fold part is really important. This means the card has three sections. You will see below, I use the structure to fasten the beaded motif and disguise the way I’ve attached it. Follow this link to buy a pack of these cards.
Of course, you are welcome to try out your own ideas. You can stitch a beaded motif onto a card. I hesitate to recommend gluing as this rather spoils the beads, I think. But you may feel differently. So, feel free to use your own creativity here too.
Shirring Elastic
You are going to use this to provide an attachment for your beaded motif. I like to use shirring elastic because it is stretchy. So, when you come to hang the decoration on the Christmas tree, this just makes life so much easier!
Plus, the shirring elastic is narrow enough to thread through a larger seed bead. So, that makes it pretty easy to attach your motif.
Having said all that, if you prefer, you can use some very narrow ribbon. Or, possibly some strong thread.
Whichever you decide to use, I suggest you think about the colouring too. So, you might try green as this will blend in with the Christmas tree branches. Alternatively, gold or silver are great Festive options. Or, go with a colour to match your beaded motif. This link gives you a choice of colours.
Christmas Paper or Material
When I make my beaded cards, I like to think about how they will look after the beaded motif has been removed. So, this is simply thinking about how to create a hand-made card.
You can go as simple or as complex as you like here. The simplest option is just to use a piece of patterned paper or material to place behind the beaded motif in the aperture. This makes it really quick to put each card together.
You might like to add some additional decoration. I sometimes try to create a simple image that will reflect my beaded motif. So, for the parcel motif I’m using here, I added an image of a stocking filled with gifts.
You can also think about whether you want the beaded motif to really stand out against the background, or blend in.
I will just mention, the papers I am using here were all part of a Christmas card craft pack. It came with my October issue of Crafts Beautiful Magazine. You can easily pick up similar festive crafting packs in your local craft shop. Or follow this link to get a fabulous Christmas craft paper selection.
Step 3
This is where I begin to teach you how to make beaded Christmas cards! So, we are going to start with your little motif.
Cut about 6″ (15cm) of shirring elastic. Thread this through a bead on the top of the motif. Then tie the two ends of the elastic together to create the hanging loop for your decoration.


Step 4
Now, take your card blank and open it out flat. Make sure you are looking at the ‘wrong’ side (this is the part that will be ‘inside’ the card).
This step attaches your motif to the card. So, follow the instructions carefully.
Start by cutting about 1.5cm of sellotape. You are going to stick this at the centre top, just above the aperture.
Then, cut a second piece of sellotape – about 3-5cm long. Take your motif and carefully position the knotted end of the shirring elastic on top of the short piece of sellotape you just added. Stick it in place with the longer piece of sellotape.


In case you are wondering about my logic here, it’s simple. You know how it’s easy to peel sellotape off sellotape? But it’s hard to peel sellotape off paper? Well, by securing the motif between two surfaces (sellotape) that will pull apart easily, it makes it easy to pull the decoration off the card. The card itself should remain completely undamaged.
I always used to include a note with my card to tell the recipient that this is what they could do. So, you might like to do the same. Otherwise, will they know that they can detach the beaded motif and use it as a decoration?
Step 5
Well, we’re making good progress here. Hopefully you’re coming to realise that learning how to make beaded Christmas cards isn’t so hard!
So, next step is to cover the section that will sit behind the aperture with a piece of your Festive paper or material.
I prefer to use double-sided sellotape to secure this in place as I find some glues can end up seeping through fabric or paper. But you can use glue if you wish.
Make sure you look carefully at the card structure and add your decoration to the correct side. So, your beaded motif should end up at the top of the card when it is all folded into place.
Once you have added the decoration, you can fold this face over to fix in place. Again, use double-sided sellotape or glue to secure it. Take care that you end up with a neat finish on the front.


Step 6
The last step is to add any decoration that you wish. So, I stuck a little greeting label and a Christmas picture on the front of my card.
You can get as creative as you like. Or keep it simple. You may even feel that the Festive backing is sufficient on its own. It certainly allows the beaded motif to shine through!
That’s it! You’ve just learned how to make beaded Christmas cards.
So, now it’s over to you to make the most of the beaded motifs and create some gorgeous designs.
A note on posting
If you are one of my UK readers, then these beaded Christmas cards are going to count as ‘large letter’ size. I would also recommend posting them in a padded envelope. This shouldn’t make any difference to the postage rate. But it will protect the beadwork.
When letters go through the postal system, they are subjected to the franking machine. This can put a heavy weight on the letter. So, if that weight happens to fall on the beaded motif, it is possible that the beads will break (they are glass after all!).
Grab a Beaded Motif
So, before you head off to your craft room, don’t forget to grab your beaded motif.
Just click on your chosen image below to get the motif that you want. In addition to that, I have more Keepsake card ideas in my ebook, ‘Beaded Christmas Gifts and Cards’. Plus, I designed some beaded gift tags to go with the cards. So, get your copy of the book here.
And, if you enjoyed this lesson in how to make beaded Christmas cards, sign up to my mailing list for more great beading advice!
Now, get inspired with some Christmas ornament ideas from 4 top beading designers >>