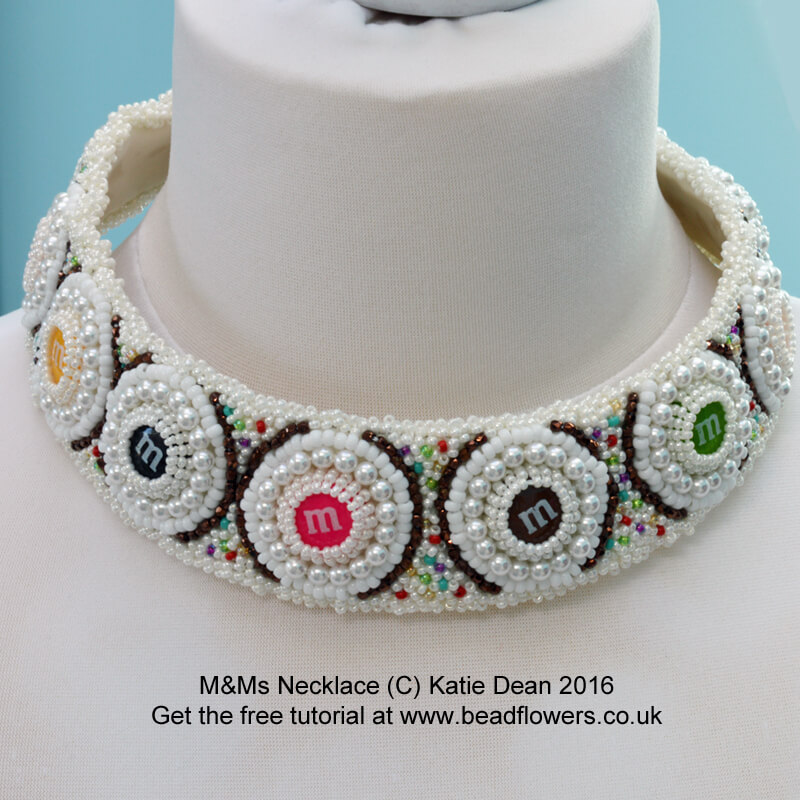
I’m going to be sharing the free beading pattern to make this collar, so you can scroll straight down and get going if you want – I’ve marked titles to help you see where you are – or you can find out a little bit about my M&Ms Collar before you get started.
Jewellery Maker TV set all of us Guest Designers a little challenge. We were each sent one of their brass collars and asked to make something from it. All the resulting collars were to be entered in a competition and featured on facebook – you can find them and vote (while voting is open!) here. It just so happened that I had just made a purchase on a whim: when I saw these M&Ms cabochons, I couldn’t resist them. When they arrived I knew I was going to have to use them for bead embroidery because they have no holes through them, so need beading around to attach them. I suppose I could have just glued them onto a project, but where would the fun be?!
So, when I heard about the collars, my designer brain started making connections. I had the idea of a jewel embellished collar. If you know my style, then you will know that I’m firmly in touch with my ‘inner child’, so rather than go for the conventional and use actual gemstones or Swarovski crystals, I decided that I needed to use my M&Ms. So with this in mind, I was thinking about swirls of icing, maybe lashings of ice cream, chocolate, hundreds and thousands…am I making you hungry yet? Ok, time to move on to the free beading part…
Free Beading Pattern Background
I’m going to start by letting you into a secret. I’ve never made any jewellery using bead embroidery before. I’ve done a couple of little samples to try out some techniques, but that’s it! I just wanted you to know that so that when I tell you that this free beading pattern really is suitable  for anyone, you will actually believe me because I know the results look quite complex. The thing about bead embroidery is the techniques are very simple. The difference between results just comes from how neat you are. So you need to focus on being precise as you stitch the beads in place (you will see what I mean as you begin to follow the instructions). What other tips can I give you?
Keep checking your thread – you will be using it double, so just make sure that you pull it all through evenly and don’t get thread caught around your beads. Also, keep checking the back of your fabric to make sure that all the thread has pulled through and isn’t looping on the back.
Try to keep your fabric as flat as possible as you work and don’t stitch the beads too close  together. You will find that the fabric is happy to curve back which is ok to some degree, but don’t allow it to curve too much or you will have trouble fitting it back to the collar. You also need to allow the beads ‘room to breathe’ so they need to sit close enough to cover the material, but if you put them too close together they will force the fabric out of shape. This is why the precision and accuracy is required. It will become clearer as you follow the free beading pattern.
An important note on copyright: This is a free pattern, so you are welcome to use it for your own personal enjoyment, or to teach a workshop. You will not be able to publish it anywhere, but you can share it freely mong your friends, so do spread the link. If you are making a collar to sell using this design, please credit me as the designer. The copyright for the design remains with me. You are however, free to use the techniques to create your own design. If you have any questions about copyright, just get in touch! Thank you.
Starting and Finishing Thread
Starting and finishing thread is very easy in bead embroidery. Whenever you need a new thread, cut an arm-span (the length from one hand to the other when your arms are held outstretched) of thread. Thread it onto the needle and pull it through until it is double. Tie a knot (I like to tie two on top of one another to make sure I have a large ball of thread) at the end, as close to the end of the thread as you can. Just pull this through your fabric from the wrong side to the right side and you have started a new thread.
When you want to finish remember to leave enough thread: because it is double, you won’t be able to slide the needle out to extend the thread, so when it starts to feel short it’s time to finish off. Just pass through to the wrong side and overstitch 2-4 times on the back of the fabric. Make sure you do this in an area that is going to be covered with beads. For this pattern, it is easiest to do this in an area underneath one of the M&Ms. Take a look at the photo and you can see the back of the work showing where the starting knot has pulled through and where I’ve over-stitched to finish off under a bead.
Materials for this free beading pattern
Next step, armed with these handy hints, you are ready to start gathering together your materials. I’ve listed them with links that will take you straight to somewhere you can buy what you need. If you already have these in stock, then great, or if you already have a favourite supplier who can supply these things, then go for it!
Brass Collar: mine came from Jewellery Maker TV, but you will see that this free pattern can be adapted if you can’t get hold of the collar I used.
8.5″ x 11″ sheet of Lacy’s Stiff Stuff – if you don’t have this, as I didn’t (I was impatient to get on and didn’t want to buy some!), you can use material stiffened with Vilene iron-on fabric stiffener.
Material for backing – Ultra Suede is a good choice – again you will need a size equal to A4 sheet. Again, you can use an ordinary material stiffened with a fabric stiffener.
S-Lon Beading thread in white – or you can use your preferred thread: I found the S-Lon didn’t knot, so was very happy with it!
Pack of M&Ms beads (make sure you get the 14mm size – the 8mm will be too small to bead around!)
40g size 11 seed beads in cream (I used Miyuki Ivory Ceylon). These will be referred to as (A) beads.
187 4mm pearls in white or cream. I used fully round pearls, but if you want to buy from Jewellery Maker, these pearls will work.
Pack (600) of True2 Firepolish Beads in Jet Bronze – the colour is important as it looks like chocolate! These will be referred to as (B) beads.
10g size 8 seed beads in matte white (I used Miyuki brand and you can find them here). These will be referred to as (C) beads.
A handful of size 11 seed beads in each of five bright colours. These are perfect for using up oddments from your stash, or if you need to buy some, this seed bead mix is a great option. These will be referred to as (D) beads.
A pair of scissors (embroidery scissors are best), a size 10 beading needle, Blue-Tak, a sheet of A4 paper and a pen. You may also want to use a tape measure. You will need some clear glue – you can use jewellery glue or just simply use Uhu.
Preparing the Collar
Fantastic – you’ve got all your materials together, so you’re now ready to get started.
The first step is to make a paper template of your collar and use this to cut out your Stiff Stuff. Stick small pieces of Blu-Tak all over the right side of your collar. Make sure they are close enough to the edges and close enough together to ensure that you are able to stick a piece of paper accurately over the collar. I found that an A4 sheet used corner to corner almost fitted, but I had to add a small additional piece to reach to the very end of the collar. So if you need to extend your paper in any direction, just sellotape the extra securely onto your original sheet. Make sure that all of the collar is covered. Now, use a pair of scissors to cut the paper to the collar, but leave about 2mm of paper edge around the collar. This gives you your paper pattern. Look carefully at the series of photos below to illustrate these steps so far.


Take your paper pattern and lay it on your Stiff Stuff (or alternative material) and use the pen to draw around it. Cut roughly around the shape, but do not cut up to the line – you need to make sure you have material around the shape and you will trim this off at the end (look carefully at the second picture below so you can see the excess material). Next, arrange your M&Ms on the material. I used 11 of these spaced along the collar pattern. I arranged them by eye, but if you are very particular about your finish, it would be a good idea to use the tape measure to space them evenly! Start in the middle, so you ensure one bead is right in the centre and then space five evenly on either side of this. Think about colouring as you do this – arrange your colours so that the brighter and duller colours are alternated and this will add interest to the design. Or you could use all one colour, or you could arrange them like a rainbow, or any other idea you want to try. Just remember that colouring will affect the design (this blog may help!). Once you are happy with the arrangement, carefully use your pen to draw around each bead – take care you don’t move the others as you do this. Once you have drawn around the bead, you can remove it from the material, but remember to keep the beads in the right order as you’ve gone to the trouble of selecting it so carefully! Again, the three photos below illustrate this section of steps.


Starting the bead embroidery
The first stitch you are going to use is Stack Stitch. You will be using this to secure the M&Ms to the backing. (If you haven’t already read, it then scroll back up to read the section about starting and finishing thread). Start by carefully passing your needle through from back to front on one of the circles you have marked. Pick up 4(A) and slide them along your thread so they sit on the material, then pass back down through the first three beads you added. Pass down through the material from front to back, still on the circle, but about 1mm further along from where your thread is coming out. Pull your thread tight and your four beads should be sitting in a little stack on top of the circle. Follow the photos below:


Now pass back up through the material, again making sure you are exactly on your circle, and about 1mm along from your previous stack. Make a second stack. Keep repeating this technique until you have added stacks of beads all around the circle. I said in the beginning that you need to be neat and precise for bead embroidery. Well, you need to make sure that your little stacks of beads are butted up next to one another, in a neat circle, but do not get them too close together or they won’t sit flat when you do the next bit. Once you have completed your circle of stacks, pass back up through all four beads in your nearest stack. Place your first M&M bead in the centre of the circle – it should fit exactly if you have been accurate in creating your stack.


Pass through the top bead in  each of the stacks, then pull your thread up tight and this should pull all the stacks together over the top of your M&M bead. This will hold the bead firmly in place, so before you tighten the thread do make sure that the bead is sitting the right way up – you won’t be able to move it after you have secured it! Finally, pass through all these top beads once more to make sure they are held firm.
From here, pass back down through your nearest stack and get ready to repeat this whole process to attach your next M&M bead.
Once you have added all your M&M beads, you can move on to the next step. You will be using Back Stitch to add rows of beads around each M&M. You need to start this step at the central M&M bead. Pass up through the material so you exit about 2mm away from the edge of your bead stack. Pick up 2 pearls and *slide them right along the thread so they are sitting on the material. Position them around the edge of the stack, then pass back down through the material at the point where the second pearl is sitting. Pass back up through the material at the point exactly between the two pearls. Pass through the second pearl. See the photos below:


 Pass through the second pearl, then pick up two more pearls. Repeat from * to secure these pearls. This is back stitch.
Keep using back stitch to add a row of pearls all around your stack. I found that it took 17 pearls to complete a round (but this may vary if you are using different pearls). This meant that for the final stitch, I just added one single pearl and I then passed through the first pearl in my circle to secure this last pearl in place. Pass back down through the material.
Pass back up through about 2mm from the edge of the pearl ring. You are now going to add a second ring using the (B) beads. You will still be working in Back Stitch, but this time you will pick up 4(B), place them on the material, then pass down through, then back up between beads 2 and 3, so you can pass on through the last two beads ready to begin the next stitch. At the end of the round, you might like to pass through all the (B) beads again to make sure the circle is sitting evenly. Take a look at the photos below:


You will find that this circle of beads should take you to the edge of the pattern line. All your embroidery needs to stay within this line (you can just about bead on it, but do not go outside it!). Next you are going to start beading another line around your circle, using exactly the same technique, but working with the (C) beads. This circle will only sit on either side, not right the way around, so remember to stop when you reach the pattern edge (see the second photo below). This completes your central bead. So, now keep repeating this technique to add a three-row circle around each of your M&M beads. You will need to work from the centre outwards along each side, so make sure you bead in order. Depending on your spacing, you may find that when you come to add the final row of (C) beads around each circle, it overlaps with the previous circle. Don’t try and force an additional row, but instead, bead up to the existing beads, then pass through a few until you can continue the circle on which you are working. Take a close look at the third photo below to see what I mean. You will also find that as you work towards the narrower edges, you won’t be able to complete your (B) beads circle either, so remember to stop this when you reach the line marking the edge of the pattern.


You s hould now just have small areas between your circles, so the final step is to fill these in using a mixture of your (A) and (D) beads. You want the majority of the beads to be (A) beads, but scatter in the (D) beads and remember to mix up the colours. This is ‘free beading’ or freeform in that it is really up to you what you do. The technique is very simple. Pass up through the material from back to front, pick up 1 bead and slide it up to the material, then pass your needle back through the material about 1mm away from where the thread is exiting, so your single bead should sit in place.
Keep adding your beads one at a time to fill in each section of blank material. You need to take care that you don’t cram too many beads into the space. You want to cover the material, but the beads shouldn’t be pressing against each other and you should still be able to flatten the material out. If you are new to this, then err on the side of too few beads – you can always add in one or two extra at the end. You will also notice how the beads ‘push’ each other around, so allow them to find their place as you go and this will help you to avoid overcrowding the space. Your little areas of beads should look like the photo and again, make sure you stay within the pattern edge line.
Assembling the Collar
Before you begin the cutting out, hold your beadwork up against the collar and make sure that the beaded area fits. Ideally it should be about a millimetre larger than the collar all the way around. If it is smaller in any place, then you can add extra beads. If you have made an accurate pattern on your backing, then this shouldn’t be a problem, but it is best to check at this stage!
If you are happy with the fit, then carefully cut around the beading. You need to leave about 1mm of material outside the beading edge and take great care that you don’t accidentally cut any of the threads holding your beads in place. It is a good idea to use embroidery scissors as they will allow you to cut accurately. Now take your cut out piece of embroidery and use this to draw a template on your Ultra Suede (or substitute material). This will be the back of your necklace. Carefully cut out the Ultra Suede template – it is best to cut just outside your marking line – you can always trim in a little tighter later, but you can’t add more material if you’ve cut out too small! Carefully glue the bead embroidery onto the front of your collar and glue the Ultra Suede onto the back. While the glue is wet, you will be able to move the material, so take some time to make sure that both materials slightly overlap the collar all the way around. Now leave the glue to dry before you finish the edges. These steps are shown in the photos below:


If your Ultra Suede is sticking out a lot from the edge of the bead embroidered area, you can trim it back to fit at this stage. You are going to finish the collar with an overstitch using the (A) beads. Prepare the thread as usual and pass through so that the knot sits in between your front embroidery and your bac king, so it should end up concealed. When you come to finish a piece of thread, you should be able to carefully oversew in your bead embroidered area and the thread will bury itself in under the beads. Pass through so you are exiting from the front (bead embroidery) along the edge just outside the point where your beading line finishes. Pick up 4(A) (or you might find that 3 or 5 beads are better – just use your discretion) and then pass through the backing and the front material so your beads sit over the top of the edge.
Keep repeating this overstitch all arou nd the edge of the collar. You need to keep the loops of beads as close together as you can, but also make sure they sit evenly. This should create a neat edge and cover up any material (or pattern lines) that still show. When you have finished, just do a quick check to make sure you have no threads sticking out – trim them carefully if you do – and your collar is ready to wear and enjoy!
You have also learned a lot of bead embroidery basics, so you can now go on to do more projects. You can use the technique for making a pattern to create a covering for any object or just to create a shape that you can  embroider. You’ve learnt some techniques for adding cabochons and beads and hopefully you are also getting a feel for thinking about using colour and designing. Bead embroidery is really ‘free beading’ or ‘freeform’, so there are no rules. I like to think about it as using beads to paint on a canvas. You can create shapes, curves, lines. The trick is to use beads in different sizes and finishes and colours to add the interest. So I hope this has inspired you to go and try some more bead embroidery. I certainly loved the process of creating this, so thank you Jewellery Maker for giving me an excuse to try this!
The Final Chapter
When I created this design I made a schoolgirl error: I forgot that Jewellery Maker can’t promote any specific brands, so having used the M&Ms, this collar couldn’t feature in their publicity. Not to be  deterred, and having loved my first foray into bead embroidery, I offered to make another collar, using the safer option of conventional gemstones! Jewellery Maker were kind enough to send me another collar and some really gorgeous gemstones, so you can see the collar I ended up making in amongst the other gorgeous designs here!
If you want more beading ideas and the chance to grab a few bargains, don’t forget that National Beading Week is just around the corner. You can be the first to find out about the offers by signing up to follow my blog (use the sign up form in the menu to the right), or if you just want to keep up-to-date with my beading news, then join the Beadflowers Mailing List to receive my monthly newsletter.