If you follow me and my blog regularly, then you may have heard me mention that one of the themes I’m exploring this month is Aquatic. So, let me share these free instructions for my new beaded necklace project with an aquatic theme…
Materials for your beaded necklace project
So, any good pattern starts by asking you to gather together your materials.
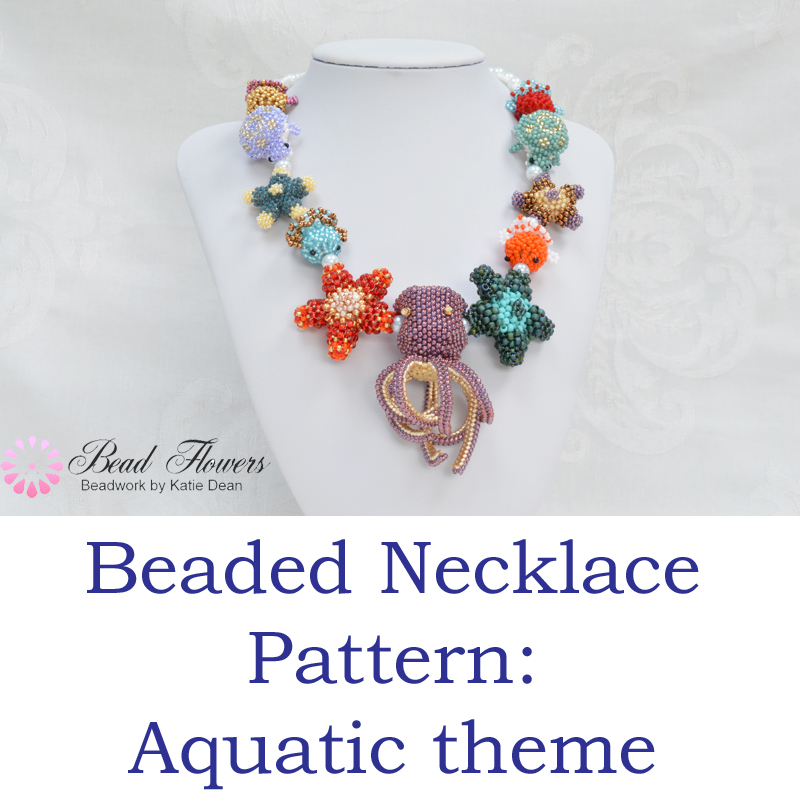
In keeping with my big project for 2019, I decided to use a collection of Aquatic themed beaded beads for this beaded necklace project. I chose four cute little characters, each of these is a pattern that I have available. So, you might choose to use all of these, or just some of them.
My octopus beaded bead provides the focal point for this necklace. You can get that pattern here>>
 Then, I used four little Star Fish beaded beads. In that pattern, I gave you two size options. Use size 15 and size 11 seed beads for the smaller star fish. Then work with size 11 and size 8 for the larger star fish. I made two star fish in each size.
You might choose to do the same, or you might do something different. You can grab a copy of the star fish pattern here>>
 I also used four little fish. They came from my simple netted fish beaded bead design. Again, you might choose to make a different number. Whatever you decide, this links to the pattern>>
 Finally, I used two of my sea turtle beaded beads. So, I was able to mix and match these between the fish and the star fish. You can find the pattern for the sea turtles here>>

In addition to your beaded beads, you will need the following:
- At least thirty 8mm pearls
- 1g size 11 seed beads
- A toggle clasp
- Beading thread
Planning your design
I’ve already hinted at this. Your beaded necklace project will involve some design decisions. This is what makes the necklace personal to you. So, let me take you through those decisions. Then, you may want to come back and consider your materials again.
The first decision: colouring
When I began making my beaded beads, I hadn’t decided on my beaded necklace project. So, I only considered making each beaded bead in a wide range of colours.
Actually, that philosophy has worked for the necklace. The more colours you mix together, the better, if you are going to follow this path.
However, you might want to plan your necklace in advance. So, do you choose a selection of colours (say, 3-5) and use these for all your beaded beads?
Or maybe you pick a colour for each creature.
You might choose to use a bold mix of colours. Or you might decide on shades of a single colour.
Whatever decision you make for your beaded beads will then affect your choice of colour for the stringing materials.
So, because I had such a bright mix of colours in my sea creatures, I needed something subtle for stringing. I thought about my sea theme. Blue may be the colour of the ocean, but it didn’t contrast enough with my beaded beads. So, I decided to go for white. I thought this reminded me of sea foam.
What would work best with your chosen colour scheme? A contrast? Another shade of your chosen colour? Something bright or something subtle?

The second decision: design
Once you have your colour scheme, you can move on to planning the design of your beaded necklace project.
How many different creatures are you going to make?
How many of each creature?
Will you alternate them when you string them, or group them in ‘types’?
Are you going to use them all around the neckline, or just turn them into a focal front area?
What will you use for stringing?
My design choices
I had enough beaded beads to string around the front section of my beaded necklace. So, I decided to keep it at that and use some simple strung beads across the back. After all, the back section of a necklace is often hidden by hair, or clothing.
However, these beaded beads were heavy when I strung them all together. So, I felt I would like to create a more stable ‘string’ across the back. I chose a simple bead-weaving stitch called ‘wave stitch’. This is similar to a string of beads. But the seed bead edging gives it some interest and also extra strength through the thread path.
Other options
I also considered using a wire-based stringing material, like Beadalon. If you wanted to investigate that, you would just need some simple beads to string on either end of your beaded bead section. You can find out more about creating jewellery using that method, in this blog>>
The Beaded Necklace Project
Once you have decided on your options, it’s time to begin your beaded necklace project.
If you have decided to try some different options to me, please go ahead. If you want to try using the techniques and ideas that I used, then read on…
Step 1 – the focal front
When I am making a necklace that has a ‘front section’, it can be very difficult to determine how long a string I will need on either side of that.
So, I like to start by cutting a double arm-span of thread. Then, string my front section of beads and move them to the centre of the thread.
This leaves me with a long tail on either side and I can use each end to add the string and get just the right length.
Whereas, if I start with the clasp, add half the string, then the front section, I may find that my necklace is going to end up the wrong length. So, I would have to remove the focal front section and try to alter the length of my first strung section. I may still not get the length quite right. So, this can become a fiddly and time-consuming process.
For my front section, I alternated my beaded beads with my pearls.
Step 2 – wave stitch
Now, with my beaded beads and pearls strung into position, I was free to add the length of wave stitch to each end of my necklace.
If you have never used this technique before, it is very simple.
Pick up one 8mm pearl, 10 size 11 seed beads. Pass through the pearl again, so your seed beads sit around the side of your pearl. I like to reinforce the thread path by passing through all these beads again.
Then, pass on through the pearl one more time and through just the first TWO seed beads. See the diagram below…
 Remember, if you are using this for your necklace, you will need to snuggle this structure right up to the end of your strung section (represented by the circle in the diagrams).
Now, pick up one 8mm pearl and 8 size 11 seed beads. Pass through the two seed beads from your previous stitch, then on through the pearl and the first two seed beads you just added. See the diagram below.
 Just keep repeating this second step until you have as many pearls and waves as you need. (I used ten on each side of my necklace).
As this is a heavy project, I liked to reinforce the thread path on each stitch before I continued on to the next.
I recommend you add your wave stitch section to both sides of the necklace before adding the clasp. That way, you can check that the length is right.
Step 3 – adding the clasp
When you come to add the clasp, you just need to pick up 8 seed beads, pass through one half of your clasp, pick up another 8 seed beads and pass through the final two seed beads on your last pearl wave. Reinforce this thread path two or three times.

Step 4 – reinforcing to finish
You should have a long enough thread that you can weave back down the wave section and through the focal section, then back up the other wave section. Do this with both ends of the thread. So, by the time you have done that, you should have at least three threads through your strung focal centre.
If you run out of thread, you can join a new thread and run this the entire length of the necklace. This should help to give your necklace strength and durability.

More ideas to try
Now you’ve completed your aquatic beaded necklace project, what is next?
Well, if Wave stitch is a new technique for you, why not explore that further? You’ve just seen that the basic technique makes a quick and easy string. You can use this for a necklace or bracelet.
But, did you know, you can also embellish this stitch and create a beautiful textured look? This is a really simple technique. So, it’s a great project for beginners and a fun little alternative for more experienced beaders. If you want to find out how that works, grab a copy of my seafoam bracelet pattern. (See, I’m still keeping to that aquatic theme!)
 So, I hope that has inspired you to try a new stitch, or plan your own beaded necklace project.
Let me know how you get on in the comments below… And look out for my next blog which will take a look at how you can use 2019 catwalk trends in your beadwork.